I've been thinking about writing a little post about macro photography, and I wanted to write a review of the Canon EF 100mm f/28. USM macro lens, so to kill 2 birds with one stone I thought I'd write the review on epinions and link to it from the blog:
Puts the World in Perspective - Canon EF 100mm f/2.8 USM Lens - Epinions.com
Buy the lens from Amazon
Tuesday, December 09, 2008
Tuesday, December 02, 2008
Link of the Day - Fashion Your Firefox
One of the problems with Firefox is the need to sort through dozens of add-ons to see if they help with the things you like to do. The Fashion Your Firefox page groups together related add-ons to save some time. (Requires Firefox 3.)
Personally, I find that Firefox is the #1 memory hog on my system, so I'm tempted to install several different instances, each with just a few add-ons, and switch between them.
Personally, I find that Firefox is the #1 memory hog on my system, so I'm tempted to install several different instances, each with just a few add-ons, and switch between them.
Saturday, November 29, 2008
Link of the Day: Tag That Image - Visual Bookmarking Sites Worth Browsing - Bits Blog - NYTimes.com
It's good to see community-based tagging evolving to include images too. As a photographer, I enjoy browsing gallery sites with a wide variety of images, to get new ideas and explore new perspectives. The sites mentioned in this blog post (WeHeartIt, Fffffound, and Visualize.us) stream pictures that have been tagged by users, so you can explore by serendipity, or drill down by tag.
Tag That Image: Visual Bookmarking Sites Worth Browsing - Bits Blog - NYTimes.com
There are other sites (like ImgFave) mentioned in the comments too, so they're worth reading.
Tag That Image: Visual Bookmarking Sites Worth Browsing - Bits Blog - NYTimes.com
There are other sites (like ImgFave) mentioned in the comments too, so they're worth reading.
Saturday, November 08, 2008
Loupe the Loupe
One of Photoshop's relatively new tools is the "loupe". This handy previewing tool lets you make judgment calls about one or more photos from the Bridge, without actually opening the pictures in the editor. The loupe technique is faster, and can avoid a lot of hassle with juggling windows and changing zoom levels.
You access the Loupe by clicking on an image in the Preview pane in the Bridge. A rectangular window appears showing a 100% zoom of a small part of the picture. You can drag the window (based on the idea of a jeweller's loupe, a one-eyed magnifying glass) around to examine the most important area of the photo.
One corner of the loupe bulges out, almost like an arrow from a cartoon speech bubble. The arrow points to the spot in the photo that's being magnified, so you can see the scaled-down region and the magnified version at the same time. If the loupe blocks part of the photo you want to see, drag it to the left or right to flip the loupe so the arrow comes out of a different corner.
You can use the magnification to judge whether a photo is worth saving, cropping, or blowing up. For example, you can quickly check whether a wildlife shot has enough detail to be worth cropping and showing at close to original size. You can look at some small detail, like a license plate or sign, to see if it's legible at full size.
Where the loupe really comes in handy is to compare multiple photos. Selecting multiple pictures in the Bridge displays several seriously scaled-down thumbnails in the Preview area. If you took several pictures in quick succession, for example an action sequence where some shots are blurry, or a group photograph where different people have eyes open or closed, picking the ideal one can normally be time-consuming. Put them all up in the Preview pane, open a loupe on each one pointing to the same spot, and quickly decide which ones are too blurry, which ones are too shaded, which one has the best detail for the important region, and so on.
In this example, I put a loupe on 2 photos taken a couple of seconds apart, to see whether the shadows on the face in the first photo are too bad.

A Contrarian View on Color Calibration
Although people say that serious attention to color issues is the mark of a serious photographer, I think these days the "return on investment" isn't great enough to spend a lot of time and energy on it.
The basic issue: screens emit light, printed photos reflect light, so color and brightness that you see on the screen may turn out different in a print. Also, different computer screens (even different operating systems) vary in their display properties, so colors might not be consistent from one machine to another.
For example, when I print a photo at a local location, it will typically turn out a little darker and a little less saturated than it looks on my screen. When my photos (edited on OS X) get projected on a Windows PC at a photo club competition, I know the color balance and brightness will be a little different. And even if I just transfer photos from the iMac to the Powerbook to do a slideshow, the max brightness on the Powerbook still seems dingy by comparison. (Curse this bright iMac screen! ;-)
Old-school photographers often advise a complicated procedure to calibrate your monitor so that it's "accurate" -- the idea being that you'll edit the color balance, saturation, brightness, and so on so that it looks right on the screen, and will reproduce accurately when printed. That's the theory, anyway.
However, there are so many variables to consider that you can drive yourself crazy -- what "color space" is the photo using in Photoshop, what kind of printer are you printing on, what are all the other print settings in Photoshop, how long has it been since you calibrated your monitor because monitors "drift" over time!
And then you transfer the pictures to a computer that wasn't calibrated, or was calibrated differently, or you print on a different printer or type of paper, and once again you don't like the way it looks.
My advice? Follow only the simplest procedures that give the most bang for the buck:
- Do a one-time calibration with the simplest, cheapest method. Perhaps borrow a ColorVision Spyder and choose the automated mode where the device rests against the monitor for a few minutes and you don't have to do anything. Or on OS X, use System Preferences -> Displays -> Color -> Calibrate.
- Change your display's "Gamma" setting if your images are consistently too dark or too light when printed or on another computer. On OS X, you might find that your images are too dark when displayed on a PC or printed. In the System Preferences ... Calibrate procedure mentioned above, you can set up an alternative profile with a different (darker) gamma value, and switch to it at the drop of a hat. That darker monitor setting will "fool" you into brightening your pictures more than you normally would, which will give better results in print or on Windows PCs.
- If you can get a printer profile for your exact printer or your favorite online service, why not. For example, the Dry Creek Photo site has color profiles for many photo labs across the country, including every Costco. You can select the printer profile when printing in Photoshop. (Select Print -> Color Management -> Photoshop Manages Colors to enable the Printer Profile list.)
- When you think you have something close, run a bunch of test prints with variations of overall saturation, brightness, etc. Include a caption on each print to say which is which! These days, you can get 8x10s for only a few dollars each. Figure out how much your time is worth to sidestep hours of fiddling with printer settings.
- If you find you need to boost brightness by 10%, lower red saturation by 5%, etc. for every picture to get it to display properly on Uncle Bob's laptop or print on your local photo lab's professional printer, set up a Photoshop action, save a set of layers, or find some other way to apply that action to a whole set of photos at once. (Leaving the originals unchanged.) You might display photos in so many different contexts, no one color setting will work perfectly for them all.
Saturday, October 04, 2008
How to do Browser-Based Presentations
If PowerPoint or Keynote aren't lively enough for your presentations, why not run a live demo from a browser instead? You can drive home that what you're talking about actually exists, you can pull in information from other sources rather than showing a single screenshot or brief excerpt.
A couple of things to keep in mind when you go this route...
In most browsers, it's easy to boost the font size as needed to make the presentation visible. You know how people doing projected presentations always make lame jokes about "reading the eye chart" because they put too much small-font text on their slides? With a browser, you can bump up the font size if this happens. Firefox or Safari: Ctrl-+ for Windows, Cmd-+ for OS X. (Although this is how those keyboard shortcuts are billed, you don't need the Shift key, so it ends up really being Ctrl/Cmd-=.)
I see live demos that bog down because the presenter spends a lot of time getting back to their original page, switching between tabs, looking for the right tab, or waiting for pages to load. Here are some tips for keeping the demo going at a reasonable pace:
When you're whipping up the text of your presentation, the key point is to get it out fast. Presentation software is good for flowing text into templates with headings, paragraphs, and list bullets. To get the same kind of efficiency for text you'll slap on a web page, you can use Markdown, a text-to-HTML converter that lets you write in wiki-like style (start a line with a * to make it a bullet point, and so on).
A couple of things to keep in mind when you go this route...
In most browsers, it's easy to boost the font size as needed to make the presentation visible. You know how people doing projected presentations always make lame jokes about "reading the eye chart" because they put too much small-font text on their slides? With a browser, you can bump up the font size if this happens. Firefox or Safari: Ctrl-+ for Windows, Cmd-+ for OS X. (Although this is how those keyboard shortcuts are billed, you don't need the Shift key, so it ends up really being Ctrl/Cmd-=.)
I see live demos that bog down because the presenter spends a lot of time getting back to their original page, switching between tabs, looking for the right tab, or waiting for pages to load. Here are some tips for keeping the demo going at a reasonable pace:
Whatever is the main page of your demo/presentation, set up as many ways as you can to get back there quickly. Make it your home page, just until the presentation is over. Make it a "quick link" on the browser bookmark bar.
Browsers that can do tabs typically have a preference that doesn't have much use in day-to-day browsing. Firefox: When I open a link in a new tab, switch to it immediately. Safari: Select tabs and windows as they are created. Turn this setting on during the presentation. Every time you want to show what's behind another link, open the link in a new tab, which will immediately appear. (Windows: Ctrl-click. OS X: Cmd-click.) When finished with that page, close the tab and you'll instantly be back at your start page. (Windows: Ctrl-W. OS X: Cmd-W.)
When you're 10-20 seconds from the end of your spiel on one page, close it and open the next link. Wrap up that discussion, with the audience focus on your voice rather than the screen image, while the next page loads.
When you're whipping up the text of your presentation, the key point is to get it out fast. Presentation software is good for flowing text into templates with headings, paragraphs, and list bullets. To get the same kind of efficiency for text you'll slap on a web page, you can use Markdown, a text-to-HTML converter that lets you write in wiki-like style (start a line with a * to make it a bullet point, and so on).
Friday, October 03, 2008
OS X Tip: Storing Screencaptures in a Different Folder
You may be familiar with the keyboard shortcuts Cmd-Shift-3 and Cmd-Shift-4 to do screen captures in OS X. The "3" shortcut takes a picture of the whole screen. The "4" shortcut lets you drag an area to capture. By default, the screen captures are stored in your Desktop folder. Adding the Ctrl key to the key sequence puts the result on the clipboard.
But what if you want to store the pictures somewhere else?
With the Mac's eye-catching GUI, it's easy to forget there's a real UNIX system under the hood. You can invoke the screen capture feature from the Terminal command line with the screencapture command:
There are other options you can use, like -c to send output to the clipboard, or -t to set the output filetype. (I've got my system set to save JPGs by default, so I didn't use -t jpg in the examples above.)
In the UNIX shell, you could use the alias command to run screencapture with a preselected set of options. But that still forces you to specify the full path to the file on the command line, or switch to the directory where you want the file stored.
A more convenient technique is to use shell functions, which let you pass parameters. For example, here I create 2 commands I can use to take screen captures. blogsnap foo puts the output in foo.jpg in a predefined folder. clipsnap sends the output straight to the clipboard. mailsnap sends the output straight into a new mail message.
You can paste the commands below straight into a terminal window to define those commands temporarily, or put them into the shell initialization file (depending on the shell, typically .profile, .bashrc, or .kshrc) so that they're available in each new Terminal window.
But what if you want to store the pictures somewhere else?
With the Mac's eye-catching GUI, it's easy to forget there's a real UNIX system under the hood. You can invoke the screen capture feature from the Terminal command line with the screencapture command:
screencapture ~/pic_in_home_directory.jpg # Waits a few seconds, then captures full screen
screencapture -iW /tmp/pic_in_some_other_directory.jpg # -i = use mouse to select; -W = capture full window
There are other options you can use, like -c to send output to the clipboard, or -t to set the output filetype. (I've got my system set to save JPGs by default, so I didn't use -t jpg in the examples above.)
In the UNIX shell, you could use the alias command to run screencapture with a preselected set of options. But that still forces you to specify the full path to the file on the command line, or switch to the directory where you want the file stored.
A more convenient technique is to use shell functions, which let you pass parameters. For example, here I create 2 commands I can use to take screen captures. blogsnap foo puts the output in foo.jpg in a predefined folder. clipsnap sends the output straight to the clipboard. mailsnap sends the output straight into a new mail message.
blogsnap() {
 screencapture -iW ~/documents/Blogs/Screencaps/$1.jpg
}

clipsnap() {
  screencapture -icW
}

mailsnap() {
  screencapture -iWM /tmp/$$.jpg
}
You can paste the commands below straight into a terminal window to define those commands temporarily, or put them into the shell initialization file (depending on the shell, typically .profile, .bashrc, or .kshrc) so that they're available in each new Terminal window.
Tuesday, September 02, 2008
US Open: Federer at the Halfway Point
Well, after tonight's 5-set victory over Andreev, Federer is actually past the halfway point, but everything still applies!
The last few Grand Slam tournaments, you can sort of see Federer's preparation for the later rounds (especially an anticipated match against Nadal). For example, at the French Open, he was leaving a bigger margin for error around the court, not aiming quite so close to the lines. That was working well, cutting down on unforced errors, but he seemed to forget that strategy in the final.
Now in the US Open, different tactics but same theme. Against Alves, a right-hander, Federer was hitting tons of slice serves breaking wide in the deuce court. Why do that against a right-hander? It may still prompt a weak return that can be volleyed or angled away for a winner. But I think it's really practice for Nadal. The same play came up now and then against Andreev.
Another tactic that proved counterproductive against Andreev was to consistently approach and then volley over to the deuce side, Andreev's forehand, his best shot. Roger lost a number of points to passing shots where clearly the higher percentage play was to go to the backhand. I think he's been focusing so much on Nadal that those attacks, to a left-hander's backhand, are stuck in his head against other opponents.
I was pleased to see Federer hustling around the court and banging flat backhands against Stepanek. That's the style that will intimidate even the toughest opponents. Just have to remember to keep doing it in the last couple of rounds. I hope Muller in the quarterfinals will be an easier match, the better to recover from 5 sets in the round of 16.
Saturday, August 16, 2008
John's Olympic Experience (first week)
With the first week almost over, I thought I'd offer my personal perspective so far.
Television coverage has been inexplicably bad, as noted by The Chronicle.
Now, I happen to like beach volleyball. It's a sport I'm pretty good at, from experience with tennis and regular volleyball. I have this fantasy of wangling my way onto the Latvian team by way of my paternal grandmother. So I don't mind that coverage. But I do agree that other sports like table tennis, and non-US athletes, have gotten the least coverage ever.
The announcing I also don't mind so much. The schmaltz factor seems to be toned down since Athens. If you like to quantify such things, here's Slate magazine's "Sap-O-Meter":
But I can't let the piss-poor tennis coverage pass. We scanned the TV listings and Tivo'ed sometimes 8-12 hours per day, any block on any channel that mentioned "tennis" in its program summary. We didn't get any tennis the first 3 days, and after that only a few points here and there, no charts showing the draws or results, hardly even any match highlights. It was over a day between the time we heard that James Blake lost in the semifinals, to the point we heard who he had lost to, i.e. the other player besides Nadal who would be in the gold-medal match. Couldn't find the men's semifinals anywhere.
On other occasions when big tennis events are covered on more than one channel simultaneously, we've always been able to pick up the pattern after the first day. One channel has highlights, another jumps around while matches are on live, a certain time slot has the best match of the day, any remaining American will get a night match, and so on. This time, not a glimmer of any pattern. And online updates are a Catch-22. Because we're a day or so behind with the watching, it's no good reading the tennis news or going to the Olympic site for the draw, that would just give away matches that we forlornly imagine might be in some block we haven't seen yet.
The most interesting tennis story for me from the Olympics is Roger Federer. I'm concerned by his lack of confidence lately, and I didn't think he played very well in the Wimbledon final, despite all the "best match of all time" blather. His loss to Blake demonstrated that he didn't read my blog post about things to learn from Nadal. He didn't change up the speed when the rallies got hard and flat as Blake prefers. When he ran around his backhand, his forehands were either predictable inside-out ones, or he missed the occasional down-the-line attempt or didn't put anything on it.
Winning the doubles gold may help Federer get back on track. In doubles, you have to keep things positive with your partner all the time. Instead of hanging your head after you (or your partner) make a bad shot, you have to cultivate short-term memory loss. If the opponents win a point with a good play, you can still give your partner a fist bump or low five to acknowledge that you're following the right strategy. Serving in doubles involves changing positions, going for extra angle, and getting a high percentage of first serves -- all things that have gone wrong for a game or two during each of Federer's recent losses. The net play forces you to hit volleys in crunch situations, unlike the Wimbledon final where Roger had too many desperation volleys in the fifth set, and even ceded the net to Rafa over the last couple of games. And doing it for Queen and Country, and mentoring a less-experienced player through a bunch of tough matches, may help Roger in singles when he needs to visualize the positives of getting through a close match, not just the negatives like "shouldn't lose to this guy", "there goes the #1 ranking", "Rafa made a comeback, maybe this guy will too", and so on.
Saturday, August 09, 2008
Inside Outside, Metadata
Every time I hear the word "metadata", I cringe a little bit. It's one of these simple intuitive notions that everyone has experience with, but in the tech world it's loaded up with so much jargon that it gets lost in the clouds.
With iTunes, you might be familiar with metadata as the editable Song, Artist, Album, etc. fields on the Info panel when you do File -> Get Info. This is information about each song that's stored inside the song file.
There's also metadata that's outside the file itself, like what directory it's in or even the filename. You can move the file around and rename it, and it's still the same song. It just might be harder to find unless you name it and file it in a logical way.
When you import songs into iTunes, this "inside/outside" distinction can be important if the songs come from a source other than songs ripped from a CD by iTunes. For example, maybe the songs have names like "01 - Great Song.mp3" in a folder "My Favorite Band/Their Best Album". You drag a bunch of songs like that into iTunes, only to discover that the fields in the "Get Info" panel are all blank, and now the song is filed in your iTunes Music folder under "Unknown Artist/Unknown Album".
How do you avoid that happening? The key is to make sure that all the information -- the metadata -- that you know about each song gets stored inside the song file before you let iTunes start messing around with the file names and locations.
You have some options, depending on how you're importing...
Let's say you are ripping a CD out in the woods or in a plane, someplace with no Internet access so iTunes can't automatically retrieve the track info. If it's a well-known CD, you can probably retrieve the track info later, so no worries. But if it's an indie release, an import, or just something obscure, you might be forever left with some files named "Track 20" and so on and nothing else to go by.
When you're ripping or importing a bunch of songs all from the same artist, import them into a playlist named for the artist and album. That way, even if no other information is available, you can go back to that playlist, select all the songs, and in the "Get Info" dialog, fill in the same artist, album, genre, year, "Disc n of n", and so on for all the songs at once. If you're importing several albums by the same artist, you can make a separate playlist for each one. Perhaps make an iTunes folder named for the artist, then separate playlists underneath named for each album.
Let's say you're importing songs that weren't created by iTunes, say a fanboy collection of bootlegs that are arranged in some special hierarchy, like one folder named "1972" with a bunch of concerts from the same tour, then another one "1975" and so on. You want to preserve the information from this hierarchy so you can fill in the year etc. if those fields aren't filled in in the "Get Info" panel.
This situation calls for a more elaborate process. Make sure that the setting under Preferences -> Advanced -> General, "Copy files to iTunes Music folder when adding to library" is turned off. Then you can drag the files into iTunes and the Get Info -> Summary panel will still show you the full folder path of the file. You can examine the files to see which info fields are filled in, which ones you need to fill in yourself, and you can refer to the Summary panel if the track number, year, album, etc. aren't available in the title of the song.
When you're done with this initial step, remove the files from your iTunes library -- select the songs and hit Delete within the main Music part of the library, or Alt-Delete within a playlist. Because the songs aren't actually underneath the iTunes Music folder, iTunes won't ask about moving the original files to the trash. They'll stay exactly where they are, just now with some extra metadata inside the actual files.
Now you can go back to Preferences and turn the "Copy files..." setting back on. Import the files again, and now they'll go into the iTunes Music folder under the familiar "Artist/Album" folder path. Because you've already filled in these info fields for all the songs, you don't have to worry about them ending up under "Unknown Artist/Unknown Album".
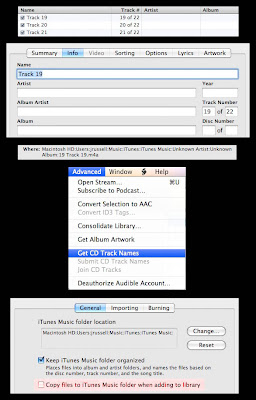
In this example, we see some files that I really did rip way out in the wilderness with no Internet access. Learn from my mistake! First, we see the completely unhelpful song names, with no artist or album filled in. Because I just imported them into my main music library, instead of dragging into a descriptively named playlist, there's no clue I can use to go back and fill in the info. The Get Info -> Summary panel is no help, it shows me they're filed under "Unknown Artist/Unknown Album". I tried using the menu item Advanced -> Get CD Track names, but the CD was too obscure , it isn't listed in the Internet CD Database. If I had imported existing MP3s from a folder named after some combination of band, album, year, etc., I could avoid the "Unknown Artist/Unknown Album" mystery by unchecking the "Copy files..." option in Preferences -> Advanced -> General, at least until I had filled in all the other fields. Then I could turn on that option, remove the files from the library, and re-import them to file them in a central, easy to find location.
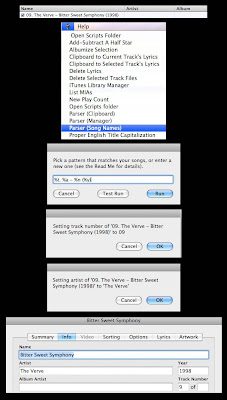
When you import songs that have all the info encoded into the filename, such as "1. 1991 - One-Hit Wonder - Flash in the Pan - Only Album.mp3", it doesn't have to be tedious to retype all these items in the Get Info fields. For users of iTunes on the Mac, there's an Applescript called TrackParser that can pull out these extra pieces of information from the song name, fill them into the appropriate fields, and strip them out of the song name field.
In this example, we start with a song that has all the info packed into the song name. After running the TrackParser script, we construct a pattern using placeholders for the important parts, and matching the punctuation and spacing of the remainder of the song name. First, we click the "Test Run" button to see whether the pattern will pull out the right pieces of information and put them in the right fields; we keep clicking OK until we're satisfied that the pattern is accurate, then click Cancel to end the test run. We go through the same steps again, and the same pattern is still filled in. Clicking Run this time makes the script really fill in the other fields and trim the extra info out of the song name. In the end, the Get Info panel reflects the right song information.
With iTunes, you might be familiar with metadata as the editable Song, Artist, Album, etc. fields on the Info panel when you do File -> Get Info. This is information about each song that's stored inside the song file.
There's also metadata that's outside the file itself, like what directory it's in or even the filename. You can move the file around and rename it, and it's still the same song. It just might be harder to find unless you name it and file it in a logical way.
When you import songs into iTunes, this "inside/outside" distinction can be important if the songs come from a source other than songs ripped from a CD by iTunes. For example, maybe the songs have names like "01 - Great Song.mp3" in a folder "My Favorite Band/Their Best Album". You drag a bunch of songs like that into iTunes, only to discover that the fields in the "Get Info" panel are all blank, and now the song is filed in your iTunes Music folder under "Unknown Artist/Unknown Album".
How do you avoid that happening? The key is to make sure that all the information -- the metadata -- that you know about each song gets stored inside the song file before you let iTunes start messing around with the file names and locations.
You have some options, depending on how you're importing...
Let's say you are ripping a CD out in the woods or in a plane, someplace with no Internet access so iTunes can't automatically retrieve the track info. If it's a well-known CD, you can probably retrieve the track info later, so no worries. But if it's an indie release, an import, or just something obscure, you might be forever left with some files named "Track 20" and so on and nothing else to go by.
When you're ripping or importing a bunch of songs all from the same artist, import them into a playlist named for the artist and album. That way, even if no other information is available, you can go back to that playlist, select all the songs, and in the "Get Info" dialog, fill in the same artist, album, genre, year, "Disc n of n", and so on for all the songs at once. If you're importing several albums by the same artist, you can make a separate playlist for each one. Perhaps make an iTunes folder named for the artist, then separate playlists underneath named for each album.
Let's say you're importing songs that weren't created by iTunes, say a fanboy collection of bootlegs that are arranged in some special hierarchy, like one folder named "1972" with a bunch of concerts from the same tour, then another one "1975" and so on. You want to preserve the information from this hierarchy so you can fill in the year etc. if those fields aren't filled in in the "Get Info" panel.
This situation calls for a more elaborate process. Make sure that the setting under Preferences -> Advanced -> General, "Copy files to iTunes Music folder when adding to library" is turned off. Then you can drag the files into iTunes and the Get Info -> Summary panel will still show you the full folder path of the file. You can examine the files to see which info fields are filled in, which ones you need to fill in yourself, and you can refer to the Summary panel if the track number, year, album, etc. aren't available in the title of the song.
When you're done with this initial step, remove the files from your iTunes library -- select the songs and hit Delete within the main Music part of the library, or Alt-Delete within a playlist. Because the songs aren't actually underneath the iTunes Music folder, iTunes won't ask about moving the original files to the trash. They'll stay exactly where they are, just now with some extra metadata inside the actual files.
Now you can go back to Preferences and turn the "Copy files..." setting back on. Import the files again, and now they'll go into the iTunes Music folder under the familiar "Artist/Album" folder path. Because you've already filled in these info fields for all the songs, you don't have to worry about them ending up under "Unknown Artist/Unknown Album".
In this example, we see some files that I really did rip way out in the wilderness with no Internet access. Learn from my mistake! First, we see the completely unhelpful song names, with no artist or album filled in. Because I just imported them into my main music library, instead of dragging into a descriptively named playlist, there's no clue I can use to go back and fill in the info. The Get Info -> Summary panel is no help, it shows me they're filed under "Unknown Artist/Unknown Album". I tried using the menu item Advanced -> Get CD Track names, but the CD was too obscure , it isn't listed in the Internet CD Database. If I had imported existing MP3s from a folder named after some combination of band, album, year, etc., I could avoid the "Unknown Artist/Unknown Album" mystery by unchecking the "Copy files..." option in Preferences -> Advanced -> General, at least until I had filled in all the other fields. Then I could turn on that option, remove the files from the library, and re-import them to file them in a central, easy to find location.

When you import songs that have all the info encoded into the filename, such as "1. 1991 - One-Hit Wonder - Flash in the Pan - Only Album.mp3", it doesn't have to be tedious to retype all these items in the Get Info fields. For users of iTunes on the Mac, there's an Applescript called TrackParser that can pull out these extra pieces of information from the song name, fill them into the appropriate fields, and strip them out of the song name field.
In this example, we start with a song that has all the info packed into the song name. After running the TrackParser script, we construct a pattern using placeholders for the important parts, and matching the punctuation and spacing of the remainder of the song name. First, we click the "Test Run" button to see whether the pattern will pull out the right pieces of information and put them in the right fields; we keep clicking OK until we're satisfied that the pattern is accurate, then click Cancel to end the test run. We go through the same steps again, and the same pattern is still filled in. Clicking Run this time makes the script really fill in the other fields and trim the extra info out of the song name. In the end, the Get Info panel reflects the right song information.

Sunday, August 03, 2008
Tennis - What Can a Right-Hander Learn from Nadal?
Chatting with my opponent during a match, we remarked that (as right-handers) we couldn't take a whole lot from Nadal's serving or positioning strategy. And as people with normal shoulders, we couldn't figure out how he does that heavy topspin forehand motion.
But, even so, there are some things that a right-hander can take away from the Nadal game.
Nadal's opponents usually know his game plan in advance. He has his favorite shots, and attributes like fitness and concentration, that he just figures are better than the opponent's. So it doesn't matter if the other guy is ready for what's coming, Rafa will stick to the plan knowing that he has an excellent chance if the match is played on his terms. You can do the same, whether your strength is the volley, consistency, angles, speed, and so on.
Clay-court positioning is way back behind the baseline. Why is this so effective? Just try hitting some balls from that position, next time you're picking up near the fence after a drill. You can fire line drives as hard as you like, with little worry that they'll go out. So next time your opponent hits something deep and/or high, retreat a few steps, bang an offensive shot someplace they don't expect, then move in and take control of the baseline again.
Ever notice how every left-hander has a heavy spin serve in the ad court that goes to your backhand? That's perfect for the left-hander because (a) the backhand tends to be the weak side, and (b) the ad court is where you serve most game-winning or game-saving points. A right-hander would be serving those sliders and kickers in the deuce court. Well, why not work on that serve anyway? Even though it's directed to most opponents' forehands, it can still push them way off the court and set you up for an easy putaway on the next shot.
Rafa has more options than most players when he runs around his backhand. In addition to the inside-out forehand (most players' favorite choice from that position), he'll often hit a heavy topspin forehand down the line, with plenty of margin for error. Not intended to be an outright winner, just to surprise the opponent, pull them out of their normal position, and prompt a weak response that makes the next shot much easier to put away. I find this shot is so rare for right-handers, they usually pull it into the alley when they attempt it. Practice this shot -- down-the-line forehands from your backhand corner -- with a little extra height and well inside the sideline. You'll mess up opponents who expect every forehand from that spot to be inside-out, and you're pretty much guaranteed that your next shot will be a forehand too.
While you may not be a natural right-hander who plays tennis left-handed, like Nadal, you can take advantage of your off-arm even if you don't have a powerful two-handed backhand. When cradling the racquet in the ready position between points, support it entirely by the left hand on the throat. The racquet is only a few ounces, and you only need a few seconds before the next point starts, but by the third set of a long match, the energy savings can really add up to keep your racquet arm fresh.
Rafa's Wimbledon win demonstrated some new shots, particularly the one-handed slice backhand. Take note! Even a player renowned for his speed is willing to slow down the pace when he's out of position or the ball is too low and hard to hit an aggressive shot. You can stay in lots of points with a deep slice, a defensive looper, or an off-speed ball. Just stay ready to go back on offense once this tactic disrupts your opponent's rhythm or wears out their patience.
Tuesday, July 29, 2008
New Feature in Google Maps: Walking Directions
This is one of those features that everyone has daydreamed about when getting short-distance directions in Google Maps. You get some convoluted route with loops and hairpin turns based on one-way streets and divided roads, when all you really wanted was to walk from your hotel to a restaurant a couple of blocks away. Now you can, with walking directions in Google Maps.
Tuesday, April 29, 2008
Life without iPod
When I spilled some water on my desk, I thought I had whisked the iPod to safety in time, but the next day I noticed telltale droplets on the bottom surface and it wouldn't turn on or charge.
I Googled various combinations of "ipod water damage", and the gist of the suggestions was to keep the iPod turned off while letting it dry (under gentle sun where possible) for up to a week. I had already made some attempts to turn it on, which may have sealed its doom. I haven't been able to get a peep out of it after several days. All the advice seemed to be for a disk-based model, and I have a flash-based Nano; don't know if the all-memory models are more susceptible to damage this way.
This poses an interesting conundrum for the commute by car. I have a 6-disc CD changer, but it only reads music CDs not MP3 CDs. The compromise I've settled on is:
- 3 CDs worth of music.
- 3 CDs worth of podcasts. (I'm working my way through the early CS courses of UC Berkeley, just to see what it is that makes Silicon Valley companies so snooty when they ask where you went to school.)
- Music CDs burned at random from one of my favorite playlists, suitable for driving.
- Music CDs not labelled at all, so I can swap 3 in randomly from a bigger selection, and have no idea what will come up.
- Podcasts carefully labelled (title and episode number), so I can fill up slots 4, 5, and 6 and keep track when wrapping around. E.g. sometimes I put the next 2 episodes in CD slots 4 and 5, before I've listened to the earlier episode that's still in slot 6.
The downside of podcasts on music CDs is that one episode takes a whole CD, assuming it's reasonably long, regardless of the bit rate / sound quality.
Saturday, March 22, 2008
Eyes on the Prize
What lessons can we learn from the physical world that also apply to the higher realms of the mind and the spirit? The old quote "eyes on the prize" is actually very practical advice!
It occurred to me that lately I've been biking, playing tennis, and discussing golf if not actually playing. And each of these activities has some variation of that same "eyes on the prize" lesson. Tennis in particular has the idiom "keep your eye on the ball", repeated so often perhaps people stopped thinking about what it really means.
The most accurate tennis shot comes when you keep your head still as you make contact with the ball. The natural impulse is to pull your eyes and attention away a moment before contact, swivelling your head so that you can follow your own shot and see where it lands. But that motion can result in a shot that's off-center or that goes off-target. Now, a tennis match involves hundreds or thousands of shots, but the outcome hinges on maybe a dozen or two critical moments. The more important the shot, the more temptation there is to be distracted, the more important it is to focus on this lesson at that moment. If your opponent is at the net and you must hit a precise passing shot, or you have a seemingly easy put-away close to the net, that's the time to keep your head very still and your attention focused on the ball as you hit it. Even for a moment after you hit it, since you'll either win the point or not based on how well you execute.
In tennis, experience means being able to visualize the whole court, pick a target, and hit that target without looking at it, while looking at the ball instead. You'll hear this same advice applied to the serve; look at the other side and decide on a target, then concentrate on the ball while executing the service motion. Like magic, the ball will seek the target more accurately than if you peek at the other side partway through the swing.
Cycling has different considerations, but along the same lines. You might have noticed, if you spot something dangerous in the road and fixate on it (a rut, a pebble, a bump, a gate), you are likely to ride straight at it despite a fervent desire to avoid it. Muscle memory doesn't know how to interpret a negative directive, "don't go there". You have to turn the impulse into something positive -- focus on some area away from the danger zone and steer towards it. Depending on how treacherous and steep your path is, you either focus on what's immediately in front of you (avoid this obstacle, reach that next milestone), or you let your imagination wander farther ahead to your ultimate goal (the finish line, home sweet home).
Golf offers a third variation on the same theme. As in tennis, you perform the same precise movement over and over. As in cycling, you are going for a positive goal that's a long way off, but it's important to avoid obstacles along the way (the trees, the water, the wrong fairway). During the golf swing, again you should keep your head still and focus on the spot where the ball is, even for a moment after you've actually hit it. The golf course is big enough, and usually unfamiliar enough, that you can't visualize an entire hole the way a tennis player pictures the court. But you can form a mental image of an intermediate target, something that if you can fly the ball over it probably means you're on-target. You want that target to be something positive (the green on the other side of the water hazard) rather than a negative obstacle (the tangled brush where you'll never find the ball).
The lessons for life almost write themselves. Focus on the positive steps you're taking towards your goals and to avoid potential problems, rather than fretting about the dangers themselves. Keep executing until success is ensured; don't look away too soon (the old "counting your chickens before they've hatched"). Concentrate on the things you can control (the ball), don't be distracted by your opponents or the hazards along the way. Gain experience and think ahead, so that you can either visualize your whole plan, or (if the whole system is too big or complicated) pick the right intermediate target to know you're on the right path.
Saturday, March 08, 2008
First Look at the iPhone SDK
I've just started downloading and reading up on the recently announced iPhone SDK. The Apple development environment, Objective-C and all those frameworks, has never quite appealed enough to me to dive into them. Using those same things for iPhone apps could be the tipping point for me.
Looks like quite a nice set of sample applications to use for a starting point. And FAQs and tutorials available the first day. That's a good sign for me. People have thought through use cases, likely questions, and getting-started scenarios. Too often, good technology is bogged down in technology for its own sake, or installation/startup problems are assumed to be handwaved away.
I'm a bit saddened that Palm didn't entice me with this kind of stuff several years ago when I tinkered with Palm programming. (I have a blog post in the back of my head entitled "Why Palm Didn't Take Over the World" that deals with that notion.) With all the emphasis on rewriting Palm OS using Linux and what have you, I never saw a push for things that I felt would yield a lot of bang for the buck. Enhancements to the PC-based client software -- the Windows version never changed much, and the moribund OS X version is so limited and painful I've stopped doing any entry or synching on OS X. (With the iPhone, is there any doubt that iTunes will keep gaining more and more capabilities? Already, the iPhone demos are supplied as movie downloads through the iTunes store.) Pushing the platform to its limits -- does it really take a complete Y2K-style rewrite to, let's say, allow to-do records to have more than one category, or 256 categories instead of 16, or some combination?
The thing that continues to hold me back me a bit, looking at the sample material, is what I think of as "frameworkitis". For every conceivable thing you might want to do, there's a different method with a long name. Just memorize a few hundred of those and you're off to the races. For learning any large system, there's a balance between the number of things to learn at the first, second, third, and sometimes fourth levels. When I evaluate the usability of any development environment, I look at whether too many things (class or procedure names) are pushed up to the top level, or whether you can learn a small number of general things, and then branch off to other things that follow logically. Let's break out that simulator and see how the iPhone APIs fit into that view of the world!
Sunday, March 02, 2008
iTunes: Adding Track Numbers to Songs
Everyone fills in the basic facts in iTunes for their songs -- name, artist, and usually album -- but don't forget another valuable piece of information, the track number!
Track number is important when you're burning an audio CD. You'll want to sort by that field to avoid the songs coming out in alphabetical or some other unhelpful order. It's important when you want to verify that you have all the tracks from an album. When listening to the album in iTunes, you can sort the songs and turn off Shuffle to re-create the album experience. Ditto on your iPod, if you turn off Shuffle or set it to Shuffle Albums, and listen to songs in album order.
If a group of songs don't already have the Track Number field filled in, don't give up hope. A couple of Applescripts let Mac users of iTunes fill it in without a lot of gruntwork.
Use the first script if your song names in iTunes are stuffed with several pieces of information, including the track number. Typically, all the songs from an album will use the same format for the name, for example "01 - Happy Birthday - Greatest Birthday Songs" or "5. Christmas Album / Jingle Bells". But each album might use a different format. That's where the Track Parser script comes in. You select some tracks, enter a coded string that says how to interpret the data, spaces, and punctuation in the names. The script scans through the selected tracks and slots the information into the right fields, while stripping that extra information out of the name field. You can experiment by doing "test runs" on a single track before you turn it loose on dozens of songs. And you can save the string patterns, so that if you encounter similarly named songs in the future, you can "decode" them just by picking from a list of sample song names.
If the track information isn't in the song names, all is not lost. You'll just need to do a bit more work. First, you'll need to download and install the Albumize Selection script. Go to Wikipedia, Amazon.com, or some other "discography" site that lists all the tracks on that album. Turn off Shuffle in iTunes, put the tracks in a playlist, and sort that playlist by the first column -- the one with no label, just numbers. That puts the tracks in the order that is iTunes' "best guess" of the right order. Once these settings are in effect in the playlist, you can drag songs up and down to reorder them. When they're in the right order, select all the tracks from the album (or from disc N in a multi-disk set), run the Albumize Selection script from the iTunes script menu, and it will fill in the "Track X of Y" information for the selected songs.
If you have to go to these lengths to find out album information, don't forget to also fill in the year for all the songs in each album. That will let you create Smart Playlists based on year or decade, and sort an artist's work in chronological order.
Wednesday, February 27, 2008
Overheard in Berkeley - February 27, 2008
"This is like the whitest place ever. Nobody's gonna shoot us!"
-- Girl hanging out in front of elementary school.
-- Girl hanging out in front of elementary school.
Friday, February 22, 2008
Photography: Shooting Action with an Ultra-Zoom
I have a love/hate relationship with my Canon S3 IS when it comes to shooting action scenes like sports. Well, actually, more like hate-hate-hate-(repeat for 2 years)-like-like-sorta-love.
The S3 IS sports a 12x zoom, which after all the crop factors and sensor sizes are said and done, gives essentially the same maximum magnification as my Canon 20D with a 70-300mm zoom lens. (I've shot identical pictures with both cameras from a tripod to verify.) However, the S3 IS is hampered by its electronic viewfinder and higher noise at high ISO settings, so it's only recently that I've started using it successfully for action scenes. At local pro tennis tournaments, the ushers come down like a ton of bricks on anything that looks like an SLR or big zoom lens, so the S3 with its barely extended lens is perfect for flying under the radar.
That 12x zoom, with such a small light body, makes it very hard to hold the camera steady and track any kind of moving subject. Like I said, it took about 2 years before I was able to track a distant flying bird, or athletes moving around a field. Even just a small turn of the body would put the subject off the screen, and the slow refresh rate of the EVF or the LCD screen meant I would overshoot trying to find it again. With an ultra-zoom camera, you have to tone down your reflexes to move or turn the camera by much smaller amounts than seems natural. Also, it's helpful to develop the technique of zooming out until you can see the subject (even as only a small dot), then zooming in while holding steady on that subject.
For an indoor sporting event, it's a challenge to shoot with available light. I choose from a few techniques here, depending on exactly how much light there is.
As a first step, I ratchet up the ISO setting with the mode dial on "P", and take note of the exposure chosen by the camera when I half-press the shutter. I look for a setting between 1/60-1/125, ideally getting it with an ISO setting of 400 max. If the shutter speed is even faster, like 1/200 or better, I'll reduce the ISO speed as far as possible while keeping in the desired range of shutter speeds. Each step in ISO setting typically changes the shutter speed by 2x, so it's easy to predict what will happen when selecting a higher or lower ISO setting. If the camera is picking 1/50 of a second at ISO 200, chances are it will pick 1/100 of a second at ISO 400.
If there is some combination that produces acceptable results at a decent ISO setting, I'll set the mode dial to "Av" for Aperture priority, then bump the aperture value as low as it will go, typically to 3.5 at minimum zoom, down to maybe 5.6 at maximum zoom. Keeping the aperture value small makes the camera select the fastest shutter speed that it thinks is reasonable, and makes the camera more responsive to the shutter button because it has fewer choices to make when you press the button.
If the camera can't quite do what you want, that is, you can't get a good picture without going to ISO 800, then consider zooming out somewhat until you can lower the aperture setting a bit. The minimum aperture depends on the zoom level, so the camera can get a brighter picture (and faster shutter speed) if you aren't zoomed in all the way. Sometimes, cropping the picture a bit is preferable to a closeup shot that is too grainy or blurry to be useful.
Another consideration is, how close to get to the action. If you are within about 30 metres of the subject, the camera needs a little time trying to focus for each shot. Even if you are farther away, it might try to focus as you lose track of the subject, or something intrudes on the foreground or background. For sports, I find the fastest response when I get far enough away to set the camera on manual focus at infinity, and then just leave it on that setting for all the shots. The same applies to distant wildlife.
Another way to speed up responsiveness is to turn off the "review" setting, which brings up the image for a few seconds after each picture is taken. If you want to snap multiple shots in quick succession (as opposed to continuous shooting where you just hold down the shutter button), you'll have to half-press the button to get rid of the review image, recompose the shot in the viewfinder, then complete the shutter press. Very difficult to do with a moving subject. Set the camera on continuous shooting mode, but also turn off the review feature. Wait for a lull in the action to go back and delete any that didn't turn out.
When composing a sports picture with an ultra-zoom, plan ahead to minimize the amount of panning and tracking, because the EVF/LCD just aren't very good for that. For example, at a tennis match, compose the shot leaving room for the player to move forward as they serve, so that you can hold the camera steady and just press the shutter at the right moment. In the same way, zoom out far enough that you can get a large area of the court in your field of view, rather than swivelling the camera as the player runs back and forth. In a doubles match, you might keep the camera locked on the area up by the net, to capture exciting volleys. With the camera covering a large enough are of the court, you can forget about the EVF and LCD altogether, just watching the action as normal and firing the shutter without looking at the camera at all.
One last tip, this one a bit specialized. The Canon S3 IS has a special "wide-angle" mode that essentially just crops off the top and bottom of the frame, so the picture becomes a panorama, even though the resolution isn't any different than just taking a normal picture and doing the cropping yourself. I've rarely felt the need to use this mode in day-to-day shooting. It's one of the choices for the "Size" button, alongside Small, Medium, and Large.
For sports, surprisingly, I do find some uses for the wide setting. Shooting a tennis match, I noticed every picture had a large area at the top showing nothing but the crowd in the stands. With the panoramic setting, I could focus in on just the court. From a practical point of view, taking a picture of a smaller area makes it easier for the camera to measure the exposure for the important part of the picture, and probably makes the camera more responsive because it's processing and saving fewer pixels. (Although I haven't measured the precise speedup.) Also, if space on the memory card or the computer is an issue, each picture shot this way is smaller than a full-size photo.
Saturday, February 02, 2008
Final Season of The Wire
Some thoughts from me on "The Wire", widely acclaimed as the best show in TV history, now entering its final season.
Personally, I would vote for "Barney Miller" as #1, but "The Wire" is closing the gap fast.
When I want some insightful analysis, I turn to the blog of Tim Goodman, TV critic for the San Francisco Chronicle.
This season with the newspaper subplot seems to be starting off a little slow for me. But then, I thought that the school subplot was heading in a predictable direction last season, but then it went in surprising and very effective directions.
The theme I saw emerging in the latest episode, "Transitions", was one of advice offered but not taken, leading to complications for the younger generation and peril for the authority figures giving the advice. Marlo clearly didn't take Prop Joe's offer to step aside. Scott the reporter is blowing off the cautionary advice from his editor. Burrell did a kind of passive-aggressive ignoring of Nerece's advice to bow out quietly, putting on a public face but still handing over the incriminating folder on Daniels. In just a momentary scene, Michael distances himself from his dysfunctional mother. The cop who goes psycho doesn't take Carver's advice on how to deal with Internal Affairs.
Wow, that's a lot of parallel action. The other show that excels at that style of narrative is "Rescue Me". Notice on that show, you don't have one character having marital problems, a drinking problem, or caring for elderly parents, you've often got two or three of them going the same way. Then sometimes the situations resolve the same way, sometimes the outcomes are complete opposites.
Tim Goodman mentions that this last season of "The Wire" seems to be rushing to tie up loose ends with the story arcs for different characters. The archetype for this tactic on HBO must be "Oz", which shares lineage with both "The Sopranos" and "The Wire". (The creators of "Oz" and "The Sopranos" are pals; many actors from "Oz" moved over to "The Wire", for example Lance Reddick and Reg Cathey.) The final season of "Oz" was hugely entertaining precisely because the plot twists zoomed by at breakneck speed, so each character could get their comeuppance or redemption.
Friday, February 01, 2008
Microsoft + Yahoo
I had a funny feeling now might be the time for Microsoft to acquire Yahoo. Yesterday, I went to Yahoo Mail for the first time in a looooong time. The new message it had notified me about turned out to be spam. When I closed the mail window, Firefox on OS X crashed. I recovered the browser session, closed that window again, another crash. Navigated away from Yahoo to another page, closed the window, crash. Used the "Zap" bookmarklet to disable all Javascript event handling and timers in the mail window before closing, crash.
At that point, I said to myself, Microsoft has got to have these guys. It's perfect synergy.
At that point, I said to myself, Microsoft has got to have these guys. It's perfect synergy.
Sunday, January 27, 2008
What Google Really Needs...
Google is all right as a search engine, I guess, but one obvious feature is lacking: a Scrabble mode!
Those who play Scrabulous on Facebook often find the need to Google a word to confirm if it's a real word. Notice that for any word that Google finds in its dictionary, there is a link to a definition in the upper-right corner of the results page. Search for one word, and there's a separate link "[definition]". Search for multiple words, and each valid one becomes a link to its definition. This leads to the technique of searching for multiple variations in one shot, like trying different vowels and searching for, let's say, "nat net nit not nut" to see which ones are valid. (Looks like Google gets confused about "not" and doesn't think it deserves a definition.)
However, Google will happily give you definitions for abbreviations and acronyms that aren't in the Scrabble dictionary. AO is the country code for Angola. EXO and EXA are prefixes that mean things. No good for Scrabulous.
So, how about it Google? If you can give me "personalized" search results, surely you can put a checkbox somewhere to only show definition links for real Scrabble words!
Saturday, January 26, 2008
Jo-Wilfried Tsonga vs. Rafael Nadal: The Fred Thompson Strategy
[I'm writing this having watched the semi-final of Tsonga def. Nadal, but don't know how Tsonga will do in the final.]
Tsonga's win over Nadal illustrates perfectly how less effort can translate into more results in tennis. Knowing that Nadal likes to grind his opponents down, Tsonga refused to get into a competition of emoting and fist-pumping, which would just play to Nadal's strong point of endurance. Instead, Tsonga played it cool between points and after winning games. Plenty of effort to race after defensive shots or bash his own winners, but dialling down the energy afterwards. No elaborate jumping around while waiting to return serve. And when faced with favourable court geometry, winning points with short dinks and drop-volleys. (Amazing how many players have no strategy for approach shots or volleys other than hitting risky deep shots, that are easy for a fast player to get if they move early and guess right.)
I was also impressed at Tsonga's crafty approaches, again taking a cue from Fred Thompson by coming in later than anybody else would. Nadal has his options worked out in advance when someone hits an obvious approach shot and rushes in behind it. Tsonga paused just long enough for Rafa to decide on a safe high defensive shot, then closed for winning volley.
Tennis is like rock climbing in that the best strategies often require less physical effort than you would think. In rock climbing, you keep reminding yourself to just hang there with muscles relaxed when you're not actively pushing higher. In tennis, you should remind yourself periodically that the racquet and the ball each just weigh a couple of ounces, you should never feel like you're straining to swing hard.
To get a power boost on groundstrokes, start swinging a little before you normally would, accelerate gradually but steadily, and keep the followthrough going until the swing stops by itself. It's when you tense the opposing muscles, either in anticipation of a sudden impact or to stop the swing suddenly, that each stroke feels like a major effort. Keep things loose, and your opponent's hardest shot feels like a feather coming off your strings.
For a faster serve, visualize yourself using 75% effort. Making yourself relax a little can (paradoxically) produce more power than straining trying to fire away at 100%.
I also like to minimize the exertion while waiting to receive serve. Some amount of rocking, flexing the knees, or going up on the toes can keep you ready to move in any direction, but the motion should always be slight enough to feel effortless. Otherwise, you'll tire yourself out in long matches or lengthy receiving games.
One last tip along these lines. You've probably heard advice to support the racquet with your opposite hand. That's not just to keep everything lined up at a sensible angle. Use the opposite hand to take the weight of the racquet between points; even drop your racquet hand occasionally and support thcquet at the throat with your other hand. That can make a big difference in whose shoulder or wrist cramps up in the third set!
Thursday, January 10, 2008
Berkeley Restaurant Review: 900 Grayson
I was telling someone about this blog over lunch, when they asked whether I posted restaurant reviews. I've never gotten into Yelp or other sites that take ownership of user-written reviews, so why not post some of my own here? Good idea.
Let's start with 900 Grayson, a breakfast and lunch place just inside the Berkeley border with Emeryville. We went there today while running some errands in the area. It's on 6th, a couple of blocks north of Ashby.
On an earlier visit, we were perturbed by how loud the place was; everyone was carrying on a full-volume conversation that never let up from the moment they sat down. Also the staff was inattentive, which was a common theme in the Yelp reviews. But the food was OK, and most breakfast/lunch/brunch places have some strike against them, so they stayed on the list for a followup visit.
Again, loud loud loud inside. This time the staff was very polite and attentive -- clearly management has read the reviews of the service. But today the food was markedly vegetarian-unfriendly. Four sandiches on the menu, including "panini of the day", and nothing meatless. A dish combined seitan and waffles -- clearly intended to be the single vegetarian entree -- but eggs feaured too prominently so I passed. I'm not a vegan, but dishes that are heavy on egg don't agree with me, and I notice when otherwise vegetarian-friendly places go overboard with cheese and eggs. Nice soup with a smoky pepper flavour. A nicely presented salad with pear, spinach, cashews and cranberries, but (a) not enough to be filling, and (b) hardly any pear or any noticeable flavour. The herb fries are always good, but when trying to make a meal out of the sides, I can't help but notice how pricey they are. The sandwiches all come with fries, but again, no vegetarian sandwiches today.
So, although I don't own any copyright on the whole "thumbs" deal, if I did, I would reluctantly have to point mine down. OK to pop in for fries and soup and maybe dessert if in the neighbourhood, but not for a substantial meal. I deduct points but still enjoy fancy dinner places like Lalimes that have a similar-themed menu -- natural beef this, prawn that -- yet 900 Grayson falls short for me on vegetarian/vegan-friendly dishes.
Coincidentally, the SF Chronicle just interviewed author Michael Pollan over lunch at this same restaurant.
Tuesday, January 01, 2008
Signed, Sealed, Delivered
Quick, what's the most boring thing you could possibly photograph during a trip? A sign? Right! Now I will tell you... why you should photograph lots of signs.
Even if you never include any signs in your photo slideshows, just having the pictures as you're sorting through them helps you remember exactly where you were for a sequence of shots. Maybe you did several trails and scenic overlooks on the same trip, and it's useful to know which pictures are from which spot. For famous locales, you might even assign keywords using the tags feature of Photoshop or other photo management software. Be scrupulous in starting every trip segment with a shot of the relevant sign, and you can quickly select a bunch of thumbnails and assign them all the same tag.
When you are doing a slideshow, a quick shot of a sign can help to serve as an establishing shot for the photos that follow. You can skip over it quickly, with just a few words in case the name isn't familiar. It adds more impact than if you just say "next we did the such-and-such trail" -- your viewers will see how long the trail is, the elevation of the peak you're climbing, how antique and ornate the street sign is, and so on.
Our recent trip to The Grand Canyon, Bryce National Park, and Zion National Park really illustrated this point for me. My wife diligently took a picture of the sign at every landmark. I figured, why use up several megabytes on the memory card of my expensive DSLR for a picture of a flat board with some lettering? After all, my wife is getting it in case we need it in a slideshow. Well, now sorting at home through a few thousand pictures, I really wish I had taken some reminders of which pictures are from Rainbow Point and which from Fairyland Point. Or when we did the Queen's Garden trail, did we do the Wall Street branch or Thor's Hammer?
Trying to cross-reference mine and my wife's pictures would be a pain -- the clocks on our cameras are a few minutes apart, and we only adjusted one of them for the right time zone, so combining them and doing "sort by date" wouldn't work well. For a long or far-ranging trip, go into the settings menus and make sure all cameras have identical times to the minute, and are all on the same time zone.
A little skill with the camera menus will also help with memory card anxiety. Practice switching to a lower resolution to shoot the sign (which after all, you're not going to blow up into a poster-sized print), then back to high resolution, RAW+JPEG, or what have you for the other pictures.
OK, trail signs, road signs, what other sign-like things can we think of to shoot?
Take pictures of informative signs about plants, wildlife, and geology. You might use 'em to identify flora, fauna, and landmarks from other pictures. If the sign is too wide and your camera resolution isn't high enough, take separate right and left shots so that you can read the text when you view the picture.
If you have a memorable meal in a restaurant, take pictures of the relevant menu pages. (You can take the menu away with you and do this at home or at your lodging later.) You'll have a reminder of what to recommend to others, or what wine you really liked.
Sometimes taking a picture of a map display, or a printed map, comes in handy later. I've had situations with 2 people and 1 map, the people need to separate, and the mapless person has a picture for safety. Zoom way in and scroll around in review mode if you need to consult the map on the trail or on the road.
One last tip on this subject. Sometimes I'll want to know at what point I changed some camera setting, such as white balance or ISO. I might want to evaluate how well the change worked, or apply some adjustment like color correction to only the photos taken with a particular setting. (For example, lighten all the photos taken at ISO 100; apply warming filter to all photos taken with white balance "cloudy".) I'll take a throwaway photo of a consistent subject (the sky, the ground, my foot, etc.) to signal when I'm making a change like this in the camera settings.
I hope you'll agree that signs aren't really such boring subjects after all!
Subscribe to:
Posts (Atom)