With iTunes, you might be familiar with metadata as the editable Song, Artist, Album, etc. fields on the Info panel when you do File -> Get Info. This is information about each song that's stored inside the song file.
There's also metadata that's outside the file itself, like what directory it's in or even the filename. You can move the file around and rename it, and it's still the same song. It just might be harder to find unless you name it and file it in a logical way.
When you import songs into iTunes, this "inside/outside" distinction can be important if the songs come from a source other than songs ripped from a CD by iTunes. For example, maybe the songs have names like "01 - Great Song.mp3" in a folder "My Favorite Band/Their Best Album". You drag a bunch of songs like that into iTunes, only to discover that the fields in the "Get Info" panel are all blank, and now the song is filed in your iTunes Music folder under "Unknown Artist/Unknown Album".
How do you avoid that happening? The key is to make sure that all the information -- the metadata -- that you know about each song gets stored inside the song file before you let iTunes start messing around with the file names and locations.
You have some options, depending on how you're importing...
Let's say you are ripping a CD out in the woods or in a plane, someplace with no Internet access so iTunes can't automatically retrieve the track info. If it's a well-known CD, you can probably retrieve the track info later, so no worries. But if it's an indie release, an import, or just something obscure, you might be forever left with some files named "Track 20" and so on and nothing else to go by.
When you're ripping or importing a bunch of songs all from the same artist, import them into a playlist named for the artist and album. That way, even if no other information is available, you can go back to that playlist, select all the songs, and in the "Get Info" dialog, fill in the same artist, album, genre, year, "Disc n of n", and so on for all the songs at once. If you're importing several albums by the same artist, you can make a separate playlist for each one. Perhaps make an iTunes folder named for the artist, then separate playlists underneath named for each album.
Let's say you're importing songs that weren't created by iTunes, say a fanboy collection of bootlegs that are arranged in some special hierarchy, like one folder named "1972" with a bunch of concerts from the same tour, then another one "1975" and so on. You want to preserve the information from this hierarchy so you can fill in the year etc. if those fields aren't filled in in the "Get Info" panel.
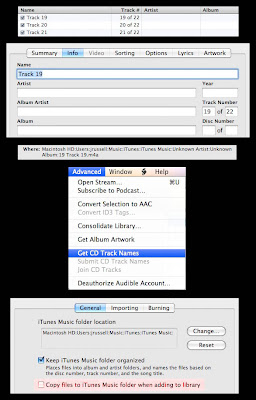
This situation calls for a more elaborate process. Make sure that the setting under Preferences -> Advanced -> General, "Copy files to iTunes Music folder when adding to library" is turned off. Then you can drag the files into iTunes and the Get Info -> Summary panel will still show you the full folder path of the file. You can examine the files to see which info fields are filled in, which ones you need to fill in yourself, and you can refer to the Summary panel if the track number, year, album, etc. aren't available in the title of the song.
When you're done with this initial step, remove the files from your iTunes library -- select the songs and hit Delete within the main Music part of the library, or Alt-Delete within a playlist. Because the songs aren't actually underneath the iTunes Music folder, iTunes won't ask about moving the original files to the trash. They'll stay exactly where they are, just now with some extra metadata inside the actual files.
Now you can go back to Preferences and turn the "Copy files..." setting back on. Import the files again, and now they'll go into the iTunes Music folder under the familiar "Artist/Album" folder path. Because you've already filled in these info fields for all the songs, you don't have to worry about them ending up under "Unknown Artist/Unknown Album".
In this example, we see some files that I really did rip way out in the wilderness with no Internet access. Learn from my mistake! First, we see the completely unhelpful song names, with no artist or album filled in. Because I just imported them into my main music library, instead of dragging into a descriptively named playlist, there's no clue I can use to go back and fill in the info. The Get Info -> Summary panel is no help, it shows me they're filed under "Unknown Artist/Unknown Album". I tried using the menu item Advanced -> Get CD Track names, but the CD was too obscure , it isn't listed in the Internet CD Database. If I had imported existing MP3s from a folder named after some combination of band, album, year, etc., I could avoid the "Unknown Artist/Unknown Album" mystery by unchecking the "Copy files..." option in Preferences -> Advanced -> General, at least until I had filled in all the other fields. Then I could turn on that option, remove the files from the library, and re-import them to file them in a central, easy to find location.

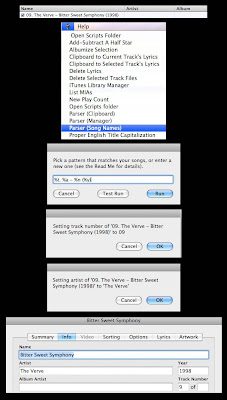
When you import songs that have all the info encoded into the filename, such as "1. 1991 - One-Hit Wonder - Flash in the Pan - Only Album.mp3", it doesn't have to be tedious to retype all these items in the Get Info fields. For users of iTunes on the Mac, there's an Applescript called TrackParser that can pull out these extra pieces of information from the song name, fill them into the appropriate fields, and strip them out of the song name field.
In this example, we start with a song that has all the info packed into the song name. After running the TrackParser script, we construct a pattern using placeholders for the important parts, and matching the punctuation and spacing of the remainder of the song name. First, we click the "Test Run" button to see whether the pattern will pull out the right pieces of information and put them in the right fields; we keep clicking OK until we're satisfied that the pattern is accurate, then click Cancel to end the test run. We go through the same steps again, and the same pattern is still filled in. Clicking Run this time makes the script really fill in the other fields and trim the extra info out of the song name. In the end, the Get Info panel reflects the right song information.

No comments:
Post a Comment